¶ 1Leave a comment on paragraph 1 0
Two summers ago I was at Vassar College’s Archives and Special Collections looking at writer Mary McCarthy’s papers; in particular, I was looking for materials relating to her opposition to the Vietnam War. I was most interested in two boxes labeled in the finding aid as simply “Vietnam.”
¶ 3Leave a comment on paragraph 3 0
When I arrived at Vassar, I discovered that Boxes 178-179 were large cartons packed with materials, and I spent two days going through them. I remember Library Specialist Dean Rogers saying to me, as I burned steadily through the boxes, “Some researchers are readers, and some are churners.”
¶ 6Leave a comment on paragraph 6 0
That distinction has stuck with me, though I tend to apply it to types of research more than types of researchers. Some research tasks require churning until we find (or don’t find) documents that help answer a research question. If we find those documents, we may slow down and start reading. Sometimes we churn because we are familiarizing ourselves with a body of materials before going in more deeply—like the first quick read through a book. At other times we visit archival collections to look at something specific, like an unpublished essay that is mentioned in the secondary literature or listed in the finding aid. In that case, we may request that item and spend our time reading it carefully.
¶ 7Leave a comment on paragraph 7 0
Given recent technological advances and policies changes at US-based archives and special collections, many of us are also taking digital photographs of materials, allowing us to churn more and do our reading elsewhere, or at a future time. Other new tools, like ArchiveGrid and EAD, allow us to easily locate multiple archival collections that relate to our research projects. These innovations present new challenges: how do we approach research in physical archives when 1) our time with an archival collection may be short, 2) we are viewing more materials than ever before, and 3) there is a greater lag between research and writing time?1
¶ 8Leave a comment on paragraph 8 0
These days, I tend to have about one to five days to spend in an archive (though I have made repeat visits to a few), and often I am not analyzing and writing about my archival research until months later, or more. For me, then, it has been crucial to develop a solid and consistent approach to doing archival research that accommodates those constraints. For me, that approach to research in physical archives has become almost exclusively digital.
¶ 9Leave a comment on paragraph 9 0
What follows is my approach to researching in physical archives, in an era of networked collections and digital photography. It is idiosyncratic (I settled on it through trial and error) but also shares much in common with practices recommended by others—librarians, archivists, and researchers. This approach has worked well for me for several years now, though it may not work for everyone or for all kinds of research. It also relies upon having the financial means, institutional affiliation, and physical ability to access university and state archives in different locations, and to purchase hardware and application software. However, for those new to using digital tools in archival research, this approach could be a place to start. You may take this post as practical advice, but also as an attempt to be transparent about what I do when I “look at the archives,” a process that is often too mysterious, especially within humanities and cultural studies fields.
Keeping a research log with an outliner
¶ 10Leave a comment on paragraph 10 0
When I arrive in the archives and sit down with my requested boxes, I keep a log of my research using an outlining application.2 For more than a decade I have taken notes with the OPML-based AquaMinds Notetaker and then Circus Ponies Notebook, which were built from the same initial program. However, this year Circus Ponies suddenly folded and AquaMinds Notebook has not been updated since 2013. Like others, I am looking for a good replacement for these programs, with one key feature in mind: the ability to create collapsible outlines within a note itself. Why? Because outlined notes match the hierarchical organization of most archival collections: collection/call number/series/box/folder. The ability to collapse and expand notes means that the research log does not become an endless scroll.
¶ 12Leave a comment on paragraph 12 0
In my research log, I use bold type and highlighting to mark the most important notes and the most relevant materials. I make a note when a requested folder held nothing of relevance, as well as when I meant to view a folder but ran out of time. I spell out words and names so I can keyword search for them later. I make sure to take notes while I’m there about how specific items relate to my project, as well as my general takeaways about a collection, when the connections are more vivid in my mind.
¶ 13Leave a comment on paragraph 13 0
The structure of my notes relates to the purpose of my research. As examples, let me use two collections I viewed while researching US-Cuba solidarity in the early 1960s. When I looked at the records of the literary magazine Pa’lante, which published a single issue in 1962, I was trying to reconstruct the magazine’s short-lived history. Given my purpose, and because the finding aid was spare and couldn’t be relied upon as a reference, I made a note for every item in the three-box collection, while only photographing some items (which I marked with a “Ph”). Where there is a caret, there are more notes beneath that item:
¶ 14Leave a comment on paragraph 14 0Figure 3. Part of my Pa’lante correspondence inventory in CPN. This collection did not use box and folder numbers, but rather was organized according to three categories: correspondence, manuscripts, and office records.
¶ 15Leave a comment on paragraph 15 0
When I looked at historian Dr. John Hendrik Clarke’s extensive personal papers collection at the Schomburg Center for Research in Black Culture, in contrast, I focused on just a few folders pertaining to his 1960 trip to Cuba and his work with the Fair Play for Cuba Committee, which I was able to locate and request using the detailed finding aid:
¶ 17Leave a comment on paragraph 17 0
(These screenshots give only a basic idea of how I organize my notes; by keeping most of my outline collapsed, I’m also protecting the privacy of those whose papers I have the privilege to read and study.)
¶ 18Leave a comment on paragraph 18 0
Why does this method of notetaking work for me? Let’s go back to the distinction between archival churners and readers; the truth is that I am a little of both. I’m reading as I churn, and sometimes I’m just solidly reading. After I read a document, I may decide a photograph is unnecessary—I can type a quote or a brief note. In other words, I take more notes than photographs. As much as possible I consider my visit to the archives as my first reading of the materials. If I simply churn and take photographs, intending to read them later, I often lose a sense of role the document played in a box or folder, or in the collection as a whole.
Taking photographs with a scanner app
¶ 19Leave a comment on paragraph 19 0
When I do take a photograph, it is because I know that I will want to reference the document again, because it’s too long to type or has important visual aspects, or because I’m short on time—usually towards the end of my visit to a collection. Taking photographs means I don’t have to transcribe texts and make extensive notes while in the archives itself, which saves a lot of time; it also allows me to build a research database. By now, most US-based research libraries allow patrons to take unlimited photos for personal research use, although different institutions have different procedures.
¶ 20Leave a comment on paragraph 20 0
But what’s the best way to take photos of documents so that you can both read them later and keep a record of their location within a collection? I highly recommend using a scanner app for a smartphone or tablet, if you have one. My favorite is an iOS app called Scanner Pro by Readdle ($3.99), which I have been using and loving for several years now, but there are plenty of others, such as the “freemium” app CamScanner (which works with iOS, Android, and WinPhone). Both Scanner Pro and CamScanner now include OCR technology that allows you to make typewritten or printed documents searchable and annotatable. For me, the benefit of using a scanner app is that it allows me to make multipage PDFs (or JPGs) of archival documents as I go, in color, black and white, or grayscale. The app can correct distortions (which is great when you are photographing a document that cannot lie flat), and its page-border recognition means that cropping is pretty much automatic. The app also allows me to name my PDF files with the collection name, box, folder, and a descriptor, matching my research log.
¶ 21Leave a comment on paragraph 21 0
Here’s a screenshot of what Scanner Pro’s automatic border recognition looks like in action, using my personal copy of Pa’lante:
¶ 22Leave a comment on paragraph 22 0Figure 5. Pa’lante no. 1 cover, being captured by Scanner Pro 7. (Edited by Howard Schulman and Elizabeth Sutherland Martínez. Cover photograph by Leroy Lucas.)
¶ 23Leave a comment on paragraph 23 0
When I save a PDF, it syncs over wifi with a folder in Dropbox (you can use other cloud services as well). When I finish an archival visit, then, I have highly organized folders of PDF files that I merely need to move from the Scanner Pro folder in Dropbox to a project folder on my computer. With Scanner Pro, I have also been able to import photos I took with my regular iPhone camera during previous research trips and also turn them into multipage, searchable PDFs.
¶ 25Leave a comment on paragraph 25 0
(Again, the low resolution here is intended to keep these documents private while also showing you how I organize them.)
¶ 26Leave a comment on paragraph 26 0
Of course, some researchers require extremely high-resolution images, and for them a dedicated digital camera may be a necessity. But for most of us, these technologies are more than enough to produce useful research documents.
¶ 28Leave a comment on paragraph 28 0
As I have said, I consider the archival trip itself to be my first read of the documents, and later I reread PDFs and notes, adding further thoughts and transcribing quotes. Often a lot of time passes between research and writing, so it is crucial that my citations are complete and that both my notes and my scanned documents are easy to locate and review. Using the approach described above means that I have recorded document locations in two places, in the name of the PDF file and in the research log. I can add annotations to my PDFs and add notes to my research log. If I return to an archive, I add a new outline item to my previous log for my notes.
¶ 29Leave a comment on paragraph 29 0
Of course, many researchers stick with pencil and paper, or a simple text file for documenting archival research. There is nothing wrong with that approach, but for many of us, the ability to take digital photographs has made archival research easier and less time consuming. The “workflow” (awful term!) I have described here has allowed me to move smoothly from taking notes and capturing images in the archives to reading, annotating PDFs, and writing—whether it be at a cafe right after the library closes, or two years later—something I’m doing now by going back to those files from Mary McCarthy’s papers.
My reflections here relate exclusively to physical archives; another challenge—that deserves its own post—is digital collections, especially when those collections are extremely large. [↩]
For more detail about the preliminary steps, like locating a finding aid and requesting materials, see “Archival Research and Digital Tools,” a blog post intended for less experienced researchers. Michele Hardesty, “Archival Research and Digital Tools,” Beyond the Riot, August 26, 2014, http://beyondtheriot.tumblr.com/post/95832495444/archival-research-and-digital-tools. [↩]
Michele Hardesty
Associate Professor of US Literatures and Cultural Studies – Hampshire College
Digital Tools for Archival Research
By Michele Hardesty
October 2016
¶ 1 Leave a comment on paragraph 1 0 Two summers ago I was at Vassar College’s Archives and Special Collections looking at writer Mary McCarthy’s papers; in particular, I was looking for materials relating to her opposition to the Vietnam War. I was most interested in two boxes labeled in the finding aid as simply “Vietnam.”
¶ 2 Leave a comment on paragraph 2 0 Figure 1. Source: Vassar College Archives and Special Collections.
¶ 3 Leave a comment on paragraph 3 0 When I arrived at Vassar, I discovered that Boxes 178-179 were large cartons packed with materials, and I spent two days going through them. I remember Library Specialist Dean Rogers saying to me, as I burned steadily through the boxes, “Some researchers are readers, and some are churners.”
¶ 4 Leave a comment on paragraph 4 0 “And I’m a churner?”
¶ 5 Leave a comment on paragraph 5 0 “Precisely.”
¶ 6 Leave a comment on paragraph 6 0 That distinction has stuck with me, though I tend to apply it to types of research more than types of researchers. Some research tasks require churning until we find (or don’t find) documents that help answer a research question. If we find those documents, we may slow down and start reading. Sometimes we churn because we are familiarizing ourselves with a body of materials before going in more deeply—like the first quick read through a book. At other times we visit archival collections to look at something specific, like an unpublished essay that is mentioned in the secondary literature or listed in the finding aid. In that case, we may request that item and spend our time reading it carefully.
¶ 7 Leave a comment on paragraph 7 0 Given recent technological advances and policies changes at US-based archives and special collections, many of us are also taking digital photographs of materials, allowing us to churn more and do our reading elsewhere, or at a future time. Other new tools, like ArchiveGrid and EAD, allow us to easily locate multiple archival collections that relate to our research projects. These innovations present new challenges: how do we approach research in physical archives when 1) our time with an archival collection may be short, 2) we are viewing more materials than ever before, and 3) there is a greater lag between research and writing time?1
¶ 8 Leave a comment on paragraph 8 0 These days, I tend to have about one to five days to spend in an archive (though I have made repeat visits to a few), and often I am not analyzing and writing about my archival research until months later, or more. For me, then, it has been crucial to develop a solid and consistent approach to doing archival research that accommodates those constraints. For me, that approach to research in physical archives has become almost exclusively digital.
¶ 9 Leave a comment on paragraph 9 0 What follows is my approach to researching in physical archives, in an era of networked collections and digital photography. It is idiosyncratic (I settled on it through trial and error) but also shares much in common with practices recommended by others—librarians, archivists, and researchers. This approach has worked well for me for several years now, though it may not work for everyone or for all kinds of research. It also relies upon having the financial means, institutional affiliation, and physical ability to access university and state archives in different locations, and to purchase hardware and application software. However, for those new to using digital tools in archival research, this approach could be a place to start. You may take this post as practical advice, but also as an attempt to be transparent about what I do when I “look at the archives,” a process that is often too mysterious, especially within humanities and cultural studies fields.
Keeping a research log with an outliner
¶ 10 Leave a comment on paragraph 10 0 When I arrive in the archives and sit down with my requested boxes, I keep a log of my research using an outlining application.2 For more than a decade I have taken notes with the OPML-based AquaMinds Notetaker and then Circus Ponies Notebook, which were built from the same initial program. However, this year Circus Ponies suddenly folded and AquaMinds Notebook has not been updated since 2013. Like others, I am looking for a good replacement for these programs, with one key feature in mind: the ability to create collapsible outlines within a note itself. Why? Because outlined notes match the hierarchical organization of most archival collections: collection/call number/series/box/folder. The ability to collapse and expand notes means that the research log does not become an endless scroll.
¶ 11 Leave a comment on paragraph 11 0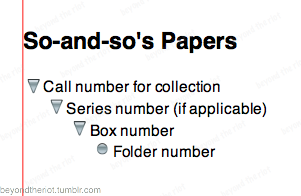 Figure 2. Structuring a research log in outline form, here using Circus Ponies Notebook.
¶ 12 Leave a comment on paragraph 12 0 In my research log, I use bold type and highlighting to mark the most important notes and the most relevant materials. I make a note when a requested folder held nothing of relevance, as well as when I meant to view a folder but ran out of time. I spell out words and names so I can keyword search for them later. I make sure to take notes while I’m there about how specific items relate to my project, as well as my general takeaways about a collection, when the connections are more vivid in my mind.
¶ 13 Leave a comment on paragraph 13 0 The structure of my notes relates to the purpose of my research. As examples, let me use two collections I viewed while researching US-Cuba solidarity in the early 1960s. When I looked at the records of the literary magazine Pa’lante, which published a single issue in 1962, I was trying to reconstruct the magazine’s short-lived history. Given my purpose, and because the finding aid was spare and couldn’t be relied upon as a reference, I made a note for every item in the three-box collection, while only photographing some items (which I marked with a “Ph”). Where there is a caret, there are more notes beneath that item:
¶ 14 Leave a comment on paragraph 14 0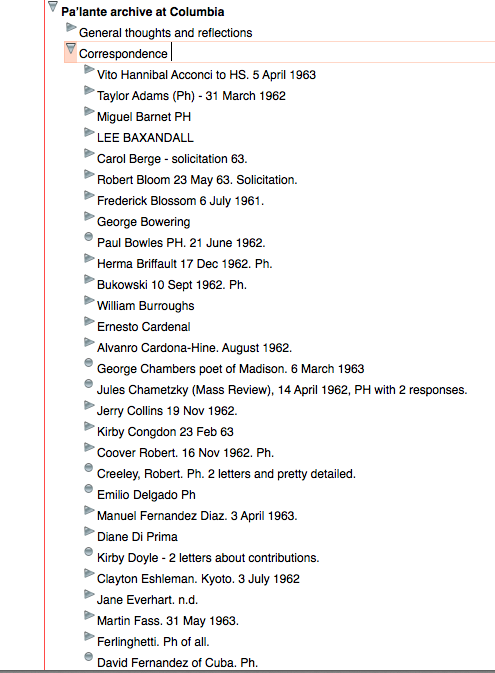 Figure 3. Part of my Pa’lante correspondence inventory in CPN. This collection did not use box and folder numbers, but rather was organized according to three categories: correspondence, manuscripts, and office records.
¶ 15 Leave a comment on paragraph 15 0 When I looked at historian Dr. John Hendrik Clarke’s extensive personal papers collection at the Schomburg Center for Research in Black Culture, in contrast, I focused on just a few folders pertaining to his 1960 trip to Cuba and his work with the Fair Play for Cuba Committee, which I was able to locate and request using the detailed finding aid:
¶ 16 Leave a comment on paragraph 16 0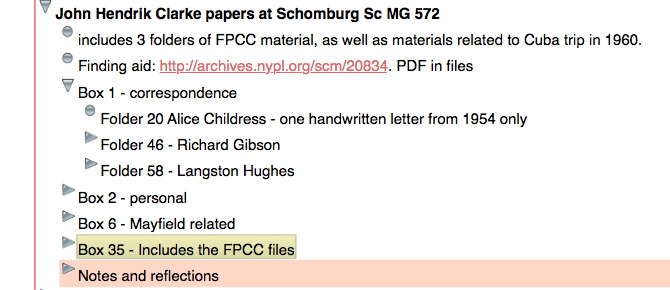 Figure 4. A slice of my notes on Dr. John Hendrik Clarke’s papers.
¶ 17 Leave a comment on paragraph 17 0 (These screenshots give only a basic idea of how I organize my notes; by keeping most of my outline collapsed, I’m also protecting the privacy of those whose papers I have the privilege to read and study.)
¶ 18 Leave a comment on paragraph 18 0 Why does this method of notetaking work for me? Let’s go back to the distinction between archival churners and readers; the truth is that I am a little of both. I’m reading as I churn, and sometimes I’m just solidly reading. After I read a document, I may decide a photograph is unnecessary—I can type a quote or a brief note. In other words, I take more notes than photographs. As much as possible I consider my visit to the archives as my first reading of the materials. If I simply churn and take photographs, intending to read them later, I often lose a sense of role the document played in a box or folder, or in the collection as a whole.
Taking photographs with a scanner app
¶ 19 Leave a comment on paragraph 19 0 When I do take a photograph, it is because I know that I will want to reference the document again, because it’s too long to type or has important visual aspects, or because I’m short on time—usually towards the end of my visit to a collection. Taking photographs means I don’t have to transcribe texts and make extensive notes while in the archives itself, which saves a lot of time; it also allows me to build a research database. By now, most US-based research libraries allow patrons to take unlimited photos for personal research use, although different institutions have different procedures.
¶ 20 Leave a comment on paragraph 20 0 But what’s the best way to take photos of documents so that you can both read them later and keep a record of their location within a collection? I highly recommend using a scanner app for a smartphone or tablet, if you have one. My favorite is an iOS app called Scanner Pro by Readdle ($3.99), which I have been using and loving for several years now, but there are plenty of others, such as the “freemium” app CamScanner (which works with iOS, Android, and WinPhone). Both Scanner Pro and CamScanner now include OCR technology that allows you to make typewritten or printed documents searchable and annotatable. For me, the benefit of using a scanner app is that it allows me to make multipage PDFs (or JPGs) of archival documents as I go, in color, black and white, or grayscale. The app can correct distortions (which is great when you are photographing a document that cannot lie flat), and its page-border recognition means that cropping is pretty much automatic. The app also allows me to name my PDF files with the collection name, box, folder, and a descriptor, matching my research log.
¶ 21 Leave a comment on paragraph 21 0 Here’s a screenshot of what Scanner Pro’s automatic border recognition looks like in action, using my personal copy of Pa’lante:
¶ 22 Leave a comment on paragraph 22 0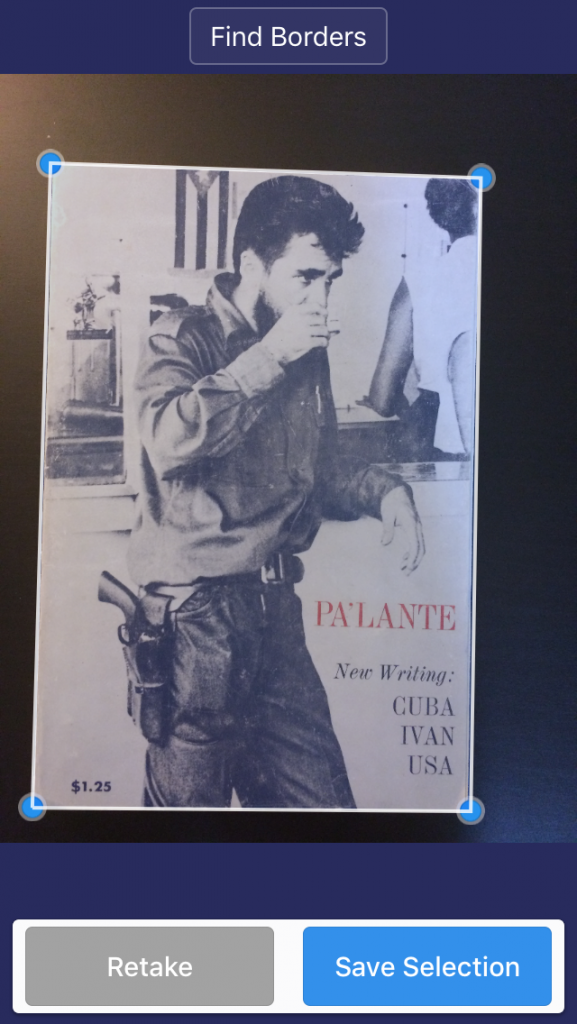 Figure 5. Pa’lante no. 1 cover, being captured by Scanner Pro 7. (Edited by Howard Schulman and Elizabeth Sutherland Martínez. Cover photograph by Leroy Lucas.)
¶ 23 Leave a comment on paragraph 23 0 When I save a PDF, it syncs over wifi with a folder in Dropbox (you can use other cloud services as well). When I finish an archival visit, then, I have highly organized folders of PDF files that I merely need to move from the Scanner Pro folder in Dropbox to a project folder on my computer. With Scanner Pro, I have also been able to import photos I took with my regular iPhone camera during previous research trips and also turn them into multipage, searchable PDFs.
¶ 24 Leave a comment on paragraph 24 0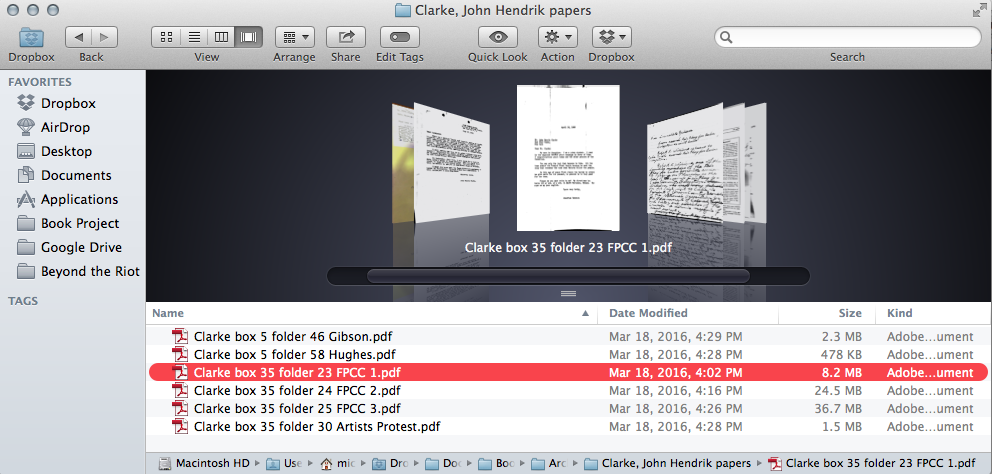 Figure 6. Scanned documents from Clarke papers in my finder.
¶ 25 Leave a comment on paragraph 25 0 (Again, the low resolution here is intended to keep these documents private while also showing you how I organize them.)
¶ 26 Leave a comment on paragraph 26 0 Of course, some researchers require extremely high-resolution images, and for them a dedicated digital camera may be a necessity. But for most of us, these technologies are more than enough to produce useful research documents.
¶ 27 Leave a comment on paragraph 27 0 In conclusion
¶ 28 Leave a comment on paragraph 28 0 As I have said, I consider the archival trip itself to be my first read of the documents, and later I reread PDFs and notes, adding further thoughts and transcribing quotes. Often a lot of time passes between research and writing, so it is crucial that my citations are complete and that both my notes and my scanned documents are easy to locate and review. Using the approach described above means that I have recorded document locations in two places, in the name of the PDF file and in the research log. I can add annotations to my PDFs and add notes to my research log. If I return to an archive, I add a new outline item to my previous log for my notes.
¶ 29 Leave a comment on paragraph 29 0 Of course, many researchers stick with pencil and paper, or a simple text file for documenting archival research. There is nothing wrong with that approach, but for many of us, the ability to take digital photographs has made archival research easier and less time consuming. The “workflow” (awful term!) I have described here has allowed me to move smoothly from taking notes and capturing images in the archives to reading, annotating PDFs, and writing—whether it be at a cafe right after the library closes, or two years later—something I’m doing now by going back to those files from Mary McCarthy’s papers.
Michele Hardesty
Associate Professor of US Literatures and Cultural Studies – Hampshire College
Footnotes
License
This work is licensed under a Creative Commons Attribution-NonCommercial-ShareAlike 4.0 International License.
Share